Since its inception in 1995, JavaScript has been synonymous with client-side interactive programming, but with the advent of the standalone JavaScript engines, this standard has changed. In particular, the introduction of Node.js has permanently changed the landscape, allowing JavaScript to be executed as a server-side application. Since its first release in 2009, Node.js has become the de-facto standard for server-side JavaScript and has brought with it a slew of major advantages, including swift non-blocking Input/Output (IO) execution and the bridging of the client and server programming language gap that has existed since the dawn of the web service age.
In this two-part article, we will explore the basics of Node.js, including its non-blocking architecture and the core of its execution environment: the event loop. We will also examine the Node.js environment, which includes a look at the Node command line tool, as well as the Node Package Manager (NPM) tool. Using this foundational knowledge, we will conclude with a walkthrough of the creation of a simple Hypertext Transfer Protocol (HTTP) server to handle HTTP requests from clients. By the end of this article series, we will have accumulated a fundamental understanding of how Node.js works and where it fits into the ever-changing world of web development.
Architecture
Although there are many server languages and frameworks in existence today, including Java, Spring, Ruby, Rails, Python, and Flask. Node.js differentiates itself in two important ways:
- It is executed as standalone JavaScript, allowing developers to use the same language for the development of web applications as well as the services that support these applications.
- It is excellent at performing IO-intensive tasks, including handling HTTP requests and interacting with file system objects.
In order accomplish both of these goals, Node.js is responsible for executing JavaScript outside of a browser, and when executing this standalone JavaScript, must do so in a manner that is fast and highly scalable. In the following sections, we will explore both of these topics, first diving into how Node.js is able to execute JavaScript code outside of a browser using an open-source JavaScript engine and then exploring how Node.js is able to quickly handle a large volume of IO tasks using an event loop.
Running Server-Side JavaScript
In a traditional setting, JavaScript is relegated to a browser, since the browser is the only application capable of taking JavaScript source code and executing it. While abstracting the execution o fJavaScript to the level of the browser is useful when creating a conceptual model of a web application, we are actually hiding some important information; namely that the browser itself does not execute the JavaScript source code, but rather, it is the JavaScript engine incorporated into the browser that takes the JavaScript source code and does some useful work with it. This concept is depicted in the figure below.
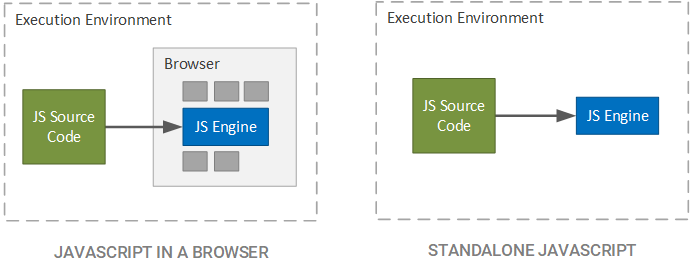
In the case of Google Chrome, the JavaScript engine is called V8 and is built into the browser to interpret JavaScript embedded within a web application (in the form of JavaScript files or as JavaScript directly included within web files, such as Hypertext Markup Language (HTML) files). Since the V8 engine is open source and packaged as its own entity, it is not required to be included in a browser. As a matter of fact, JavaScript can be theoretically run anywhere that the C++ of the V8 engine can be compiled and executed.
The Node.js Stack
Although server-side JavaScript had been tried before Node.js, it lacked serious support until Ryan Dahl (in 2009) took the V8 engine and combined it with the ability to simultaneously execute a large number of IO-dependent tasks (such as handling HTTP connections) and a swift low-level IO library. This combination allowed for truly impressive server applications to be created; in essence, Ryan had not only provided a means of executing standalone JavaScript (which had already been attempted and accomplished) but also gave a reason to desire such a standalone environment. The resulting architecture is illustrated below.

Starting from the bottom, the blue components are written in C++ and include the Google V8 JavaScript engine, the libuv (Unicorn Velociraptor library, which contains the event loop described later), and any supporting libraries, such as HTTP and socket libraries. Moving up to the next layer, the Node.js bindings represent JavaScript components used to wrap the native C++ code, allowing JavaScript code to access the underlying C++ components. Next is the Node.js Application Programming Interfaces (API), which allows our application (the topmost component) to interact with the Node.js framework and execute code in the Node.js environment.
Note that the above architecture stack is a simplification of the actual Node.js stack. For more detailed information on the stack, see Aren Li's description of the Node.js stack. Suffice to say that the core of the Node.js stack is written in C++ while the API layer is written in JavaScript; the creation of the Node.js bindings bridges the language gap, thus allowing JavaScript applications to utilize the core functionality contained in the libuv and other supporting libraries. In the next section, we will deep-dive into the workings of libuv, covering the event loop portion of the library that allows for a large number of simultaneous connections to be swiftly executed.
The Event Loop
The event loop is the core of what makes Node.js such a valuable framework, allowing for thousands and tens of thousands of simultaneous connections and responsive reactions to IO-based events. In most programming languages and frameworks, this is accomplished by the use of multiple threads or some concurrent execution mechanism, but with Node.js this is not the case. Instead, code is executed within an iterative event loop, which cycles through a series of phases and notifies application code of the completion of these steps. In this section, we will explore the concept of event-driven programming, which is at the heart of Node.js and then, using this prerequisite knowledge, look into the internals of how the event loop in Node.js operates.
Event-Driven Programming
In the vast majority of code, steps are executed in a synchronous manner, where code on one line is executed prior to code on subsequent lines. For example, if we wanted to open a User Datagram Protocol (UDP) socket in Python and listen for incoming data, we could write the following (obtained from the Python Wiki):
sock = socket.socket(socket.AF_INET, socket.SOCK_DGRAM, socket.IPPROTO_UDP)sock.setsockopt(socket.SOL_SOCKET, socket.SO_REUSEADDR, 1)sock.bind(('', 4242))mreq = struct.pack("=4sl", socket.inet_aton("224.51.105.104"), socket.INADDR_ANY)sock.setsockopt(socket.IPPROTO_IP, socket.IP_ADD_MEMBERSHIP, mreq)while True: print sock.recv(10240)Even with the inclusion of IO tasks, such as opening a network socket on a specified network interface, the code still executes in a top-down manner. The problem with this style of programming is that some calls may be blocking, where the current thread of execution halts until a specified task completes. For example, when we make the sock.recv call, our current thread waits until data is received on our socket and then continues execution once the data is received. While this ensures that we can execute code only after an event occurs, it is inefficient, since we can no longer do useful work on this thread.
In event-driven programming, we register a callback function with the system that provides logic to be executed once an event has occurred. In short, a callback can be summed up using the following definition:
A callback is an observer function that is supplied to another function to be executed at a later time when an event of interest occurs.
This allows us to both respond to events, such as receiving data on a socket, but still execute subsequent code while we are waiting for the events to occur. For example, we could have written a socket interface in Python to operate in the following manner:
class UdpSocketServer (object): def __init__(self, ip, port): self._ip = ip self._port = port self._callbacks = [] def on_data_received(self, callback): self._callbacks.append(callback) def listen(self): # Connect to socket and spawn new thread to listen for data # and execute the registered callbacks when data is recievedserver = UdpSocketServer('127.0.0.1', 5005)server.on_data_received(lambda data: print data)server.listen()print 'We are now listening'In this event-driven socket, the line print 'We are now listening' is executed immediately after the completion of the server.listen() call, even before any data is received by the socket server. This allows us to continue executing on our current thread while at the same time, responding to events as they occur. We are only able to program in this manner, though, if we have some mechanism that can listen for events and call our callback functions when the event occurs on a separate thread of execution. For example, we could delegate to the Operating System (OS) kernel for sockets or to a separate thread for files.
This type of programming is very reminiscent of hardware Direct Memory Access (DMA) used by computers to allow for large amounts of data to be transferred from a peripheral device (such as a disk to memory without causing the processor to block, waiting for the data transfer to complete. In the case of DMA, the processor tells the DMA controller to transfer a specified number of bytes from the peripheral device into memory at a specified address and interrupt the processor when the transfer is complete; the processor then continues its execution as normal and is interrupted at a later time when the transfer is complete. Just as with DMA, event-driven programming says to the event framework, "Do this operation in the background and let me know when it is done."
As we will see in the following section, Node.js has its own technique for supporting event-driven programming, which allows us to register a series of callbacks for common events, such as responding to an HTTP request or opening a file. By registering callbacks with the Node.js API, we are free from dealing with copious amounts of threads or handling low-level OS kernel calls. Instead, we register our callbacks and let Node.js handle the events in the manner it deals most efficient, knowing that when the event occurs, we are only responsible for supplying logic on how to handle the event at an application level.
The Internals of the Event Loop
The event loop is at the heart of the Node.js framework and at the core of libuv, providing the groundwork for the execution semantics of Node.js. Even with this importance, it has been a commonly misunderstood facet, causing many incorrect conceptual models to abound. In the fall of 2016, Bert Belder of IBM gave a talk on the Node.js event loop at Node.js Interactive Europe, where he cleared up much of the misunderstanding and controversy about this execution model. An abstracted view of his conceptual model is presented below:

Although this loop may appear confusing, especially with the inclusion of steps such as the Unicorn function, it is a very simple event-driven model. In this view, green circles represent steps, or phasesin the Node.js nomenclature, internally executed using Node.js code, while blue circles represent application code developed using the Node.js API (our code). The loop is entered when Node.js executes a JavaScript file and begins by checking for timeout events. If there are any expired timeouts (i.e. a timer configured to fire at 200 ms is found and 200 ms or more has expired since the timer started), the callbacks for these timeouts, represented by the blue circle, are executed. This continues until all expired timeouts have been handled.
Next, the Unicorn function is executed. In this bubble, IO events, such as network and file system events, are checked and if an event with a corresponding callback has occurred, the callback is executed. This process continues until all fired events are handled. Once all unicorn callbacks are handled, then all setImmediate callbacks are handled. While we do not cover the setImmediate function in this article, more information can be found at this Stackoverflow post by JohnnyHK.
Finally, internal closing and cleanup procedures are executed by Node.js and any callbacks tied to these procedures are executed. Once these callbacks are executed, a single iteration of the loop has been completed. The continuation criteria for the loop is based on a reference counting scheme, where each registered callback to be executed increments the reference count and each executed callback decrements the reference count. Once the reference count is reduced to 0 (denoting that there are no more callbacks that can be executed), the loop is exited.
Within Our Code
Each time a blue bubble is executed, a subsequent loop is initiated: each time our code is called, Node.js will check if there are any resolved promises within the callback, as well as if there are any nextTickcalls (which will be executed within the same iteration of the loop, rather than deferred to a later iteration). Once all promises have been resolved and all nextTick callbacks executed, this sub-loop is exited and the main event loop continues. For more information on the nextTick function, see the official Node.js Event Loop Timers documentation.
The Unicorn Function
The Unicorn function is responsible for handling the events that the OS kernel and thread pool have fired, as well as preparing near-term timeout events. In Node.js, a large portion of the IO tasks are performed through the OS kernel, such as reading and writing to sockets and handling network communications; when possible, Node.js will delegate to the functions and structures provided by the kernel and will check to see when these events have completed.
For example, when the Unicorn function is executed, Node.js will check if any IO events that can be processed on any desired IO resource, and if there are, will collect the events and process them using our callbacks. In the case of Node.js on Linux, this checking process is performed using the epollfunctionality of the kernel. For more information, see the documentation for epoll and epoll_wait.
When asynchronous tasks cannot be performed by the operating system, they are delegated to a thread pool, which allows for tasks to be executed on separate threads. During the execution of a Unicorn function, any events that are fired from the thread pool are collected and processed using our code in a similar manner to the processing of OS kernel-based events.
Prior to leaving the Unicorn phase, near-term timer events are collected, preparing them to be executed during the Timeout phase in the next iteration of the main event loop. Note that if Node.js predicts that a timeout will not occur on the next iteration of the main event loop, then a timeout event is not collected. Instead, Node.js will defer preparing this timeout event until it determines that it will be executed in the subsequent event loop iteration.
Pulling it All Together
The importance of the event loop is highlighted when we view it in the light of JavaScript: JavaScript is a single-threaded language, and thus, performing blocking IO operations in JavaScript would cause the system to wait (possibly indefinitely) until the operation completes. This means that we would be prohibited from executing any other logic while the IO operation is executed. For web services, such as an HTTP server, this is a nonstarter. To the contrary, these types of services require a large volume of concurrent IO operations (i.e. opening, handling, and closing HTTP or WebSocket connections).
The use of a seemingly single-threaded event loop not only solves the single-threaded limitation of JavaScript but also enables swift simultaneity. Using this architecture, Node.js is able to open a large number of connections directly with the underlying OS kernel (rather than forced to use a thread pool as a primary, rather than as a secondary, resource) and only maintain responsibility for executing the callbacks that we register. This reduces the overhead associated with each connection, while still allowing us to handle common tasks in a simple but rich interface.
As we will see in the following part of this series, Node.js also provides an environment that allows us to include many different packages and supporting tools that take Node.js from a simple event loop framework to a full-fledged server implementation environment.
Environment
To this point, we have seen how Node.js is able to scalably handle a large number of IO tasks, but even with the ingenuity of its architecture, the Node.js stack by itself would not be sufficient to create large-scale applications. In addition, we would need tools to make the development of Node.js applications smooth and simple. In this section, we will explore two of the most important tools; namely, the Node command line tool and NPM.
Node Command Line Tool
The Node command line tool, or node, can be used to execute JavaScript files as well as perform a host of other actions, such as evaluating single lines of JavaScript code, changing the V8 engine options while executing JavaScript, or profiling the execution of a JavaScript file. To download node, see the Node.js Download page. Once node has been installed, we can check its version using the following command:
node -vOnce we are sure that the node has been successfully installed, we can then create a simple JavaScript file named index.js(while index.jsis the standard convention used, the file can be named any valid file name) to be executed by node:
console.log("Hello, world!");We can now run this file using the following command:
node index.jsOnce the execution completes, we will see the following output:
Hello, world!Although this appears to be a simple example of how to use node, the abstraction provided by Node.js masks the importance of what we have accomplished: We were able to run JavaScript code outside of a browser. As we will see later (when we construct an HTTP server), this is the first step in establishing our JavaScript-based service. Before proceeding to the implementation of this service, we must look at a very important tool included with node: NPM.
Node Package Manager
Dependency management is one of the foremost concerns of any major project or system: tracking all dependencies, including versions, is a nearly impossible task to manually perform. Whatsmore, when the project is cloned or pulled to a new environment, attempting to find and pull all of the associated dependencies can be a nightmare. Instead, dependency management tools have been created to handle this task for us. In general, there are three major parts to a standard dependency management tool:
- Repository: contains packaged dependencies that can be used by an application; the packages contained in the repository have some metadata associated with them, including the unique identifier and version of the package, which can be used to select a specific package and a specific version from the repository.
- Dependency specification: a list associated with a project that declares the dependencies it requires, as well as the versions (or range of versions) that can be used for each dependency; some complex dependency management tools will also allow for dependencies to be valid only during a specific scope of the build or deployment process (such as the scope declaration for Maven).
- Dependency tool: inspects the dependency specification and obtains the required versions of the dependencies; these packages are downloaded to a well-known location in a project, allowing us to import the packages within the source code files we create.
In the case of Node.js, the repository is located at the NPM official website. Although we will not cover the publication of Node.js modules to the NPM repository, the curious reader can refer to the NPM publication documentation for more information. In order to specify the dependencies contained in our Node.js package, we need to create a package.json file in the same directory as our JavaScript files. In order to ease this process, the npm command line tool includes an easy technique for doing this. Simply change directory to the location that contains the JavaScript file to be packaged (the JavaScript file that requires the use of NPM packages) and execute the following command:
npm initUsing the defaults presented by npm, we obtain a package.json in the current directory (the directory containing the JavaScript files to be packaged) with the following content:
{ "name": "example-node", "version": "1.0.0", "description": "", "main": "index.js", "scripts": { "test": "echo \"Error: no test specified\" && exit 1" }, "author": "", "license": "ISC"}This package.json is very simple, containing only a handful of required key-value pairs. The name, version, and description relate to the metadata used to advertise this package for use by other packages, while the main key specifies the main JavaScript file in the package (equivalent to the main function in a Java, C, C++, or Python program). The scripts section contains a list of scripts that npm can execute on our behalf. By default, only a non-working test script is provided. Lastly, the author and license keys specify the author and the legal license associated with the package, respectively.
In order to add a new dependency (include another existing NPM package) in our project, we can use npm to download the module and include this new dependency in our package.json file. For example, if we wish to use the NPM color module (which allows us to color the text printed to the console), we can execute the following command:
npm install --save colorThis command downloads the color module to a known location, namely node_modules/; the --save flag denotes that we wish to update our package.json file to include the new dependency. If we look at our package.json file, we can see that it has been updated to include the new color dependency with a compatible version of 1.1.2 (note that the exact version value may change depending on when the command is executed):
{ "name": "example-node", "version": "1.0.0", "description": "", "main": "index.js", "scripts": { "test": "echo \"Error: no test specified\" && exit 1" }, "author": "", "license": "ISC", "dependencies": { "colors": "^1.1.2" }}For more information on the caret notation for version numbers, see the semver NPM documentation. We can now create a new index.jsfile in the current directory and utilize the colors package as follows:
var colors = require('colors');console.log("Hello, world!".red);While we can simply execute node index.js to execute our JavaScript code, we can also create a new script in our package.json file to do the same. By convention, we will call this script start:
{ "name": "example-node", "version": "1.0.0", "description": "", "main": "index.js", "scripts": { "test": "echo \"Error: no test specified\" && exit 1", "start": "node index.js" }, "author": "", "license": "ISC", "dependencies": { "colors": "^1.1.2" }}With this new script, we can now issue the following command to execute our index.jsfile:
npm startOnce we execute this command, we should see the following output on the command line, with the text of the hello world statement in red:
> node index.jsHello, world!Although we have seen that npm can perform some very impressive tasks with ease, we have only scratched the surface on its capabilities. For more information on npm and what it can do, see the official NPM documentation. In the next section, we will move from a simple program to a more useful one: standing up an HTTP server and handing HTTP requests.
A Basic HTTP Server
Creating a basic HTTP server is Node.js is akin to the common Hello, World! program in C or Java and is just as easy to build. To create this server, we first create a new directory to hold our package and initialize the directory as an NPM package:
mkdir nodejs-http-server-examplecd nodejs-http-server-examplenpm initOnce the package has been initialized, we can create a new script within the package.json file (as we did above) to execute our main file:
{ "name": "nodejs-http-server-example", ... "scripts": { ... "start": "node index.js" }, ...}With the script created, we then need to add a dependency to the httpmodule within our package:
npm install --save httpWith the dependency has been included, we can then create our index.jsfile:
const http = require('http');http.createServer((request, response) => { const { method, url } = request; response.writeHead(200, {'Content-Type': 'application/json'}); response.write(`{"message": "Received a ${method} request with context path '${url}'"}`); response.end();}).listen(8080);console.log("Started server");Line 1 of this script simply imports the httpmodule that we have installed using npm. Line 3 creates the server and creates the function that will serve as our callback for incoming HTTP requests. It is important to note that the callback requires that we provide parameters for the request and then the response. Lines 4 through 10 constitute the body of our callback, which extracts the HTTP method and URL (the portion of the URL after the hostname and port, known as the context path) of the current HTTP request being handled. We then write a status code of 200(OK) and a Content-Type entry for the response header, followed by our desired response body. We then close out our desired changes to the response on line 9.
On line 11, we then start the server, listening for HTTP requests on port 8080. Finally, on line 13, we log a message to the console stating that the server has started. To execute our JavaScript source file, we issue the following command:
npm startOnce the server starts, we see the following output:
> node index.jsStarted serverIt is important to note that the Started server output, which was written sequentially after we execute the listen method on the server, was printed before the server received a request. This is because the listen method is a non-blocking method: we simply registered a callback to be executed when HTTP requests are received and then we continued on with the normal execution of our program (which in this case, resulted in Started server being logged to the console).
If we make an HTTP POST request to http://localhost:8080, we receive the following output:
{ "message": "Received a POST request with context path '/'"}If we make another request, this time a GET request to http://localhost:8080/dzone, we receive the following output:
{ "message": "Received a GET request with context path '/dzone'"}While our HTTP server is simplistic in its functionality, we have achieved a great deal in a relatively short period of time. In only minutes and with only 10 lines of JavaScript, we were able to stand up an HTTP server and respond to actual HTTP calls. This example can be expanded much further, incorporating more complex response codes, request and response headers, and a wide variety of other HTTP functionality. The interested reader is encouraged to take a look at the Anatomy of an HTTP Transaction Node.js Guide for more information.
Conclusion
Since its creation in 2009, Node.js has radically changed the landscape of server development, providing a framework and tool suite that facilitates the use of JavaScript for both in-browser client code and server-side code as well. Not only does this allow for reuse between frontend and backend components, Node.js also provides a high-performance means of executing a large number of simultaneous IO tasks, such as HTTP or web socket requests. While Node.js may not unseat the other heavyweights in the realm of server development, it undoubtedly deserves the attention it has earned and is an undeniable asset in the toolbox of any serious web developer.
Further Reading
For more information on Node.js, see the following sources: